This post may contain affiliate links. Please read my disclosure policy.

Delicious Scones, made easy! In this recipe you’ll learn how to make a delicious morning staple, in just a little over 30 minutes! Pair with your morning coffee and you’re set for the perfect start to the day!

If you’re looking for an easy recipe for Scones, you’ve come to the right place. These babies are the perfect way to start your day, alongside a hot cup of coffee or tea! Made with simple kitchen/pantry staple ingredients, you can skip the line at Starbucks and save your money by making your own at home!
Easy Scones
- Easy To Make – Can Be Made In Advance
- Simple Kitchen/Pantry Staple Ingredient List
- Customizable/Versatile
- Perfect Breakfast/Brunch or Snack
Scones are my go to when I want something to pair with my morning coffee! Since this recipe is SO easy to make (takes just over 30 minutes) I can have these babies whipped up in a flash!
As an added bonus, you can also make these ahead of time and freeze them to enjoy whenever the craving hits! This is also a great base recipe, leaving room to add whatever you fancy into these scones.
Ingredient Notes
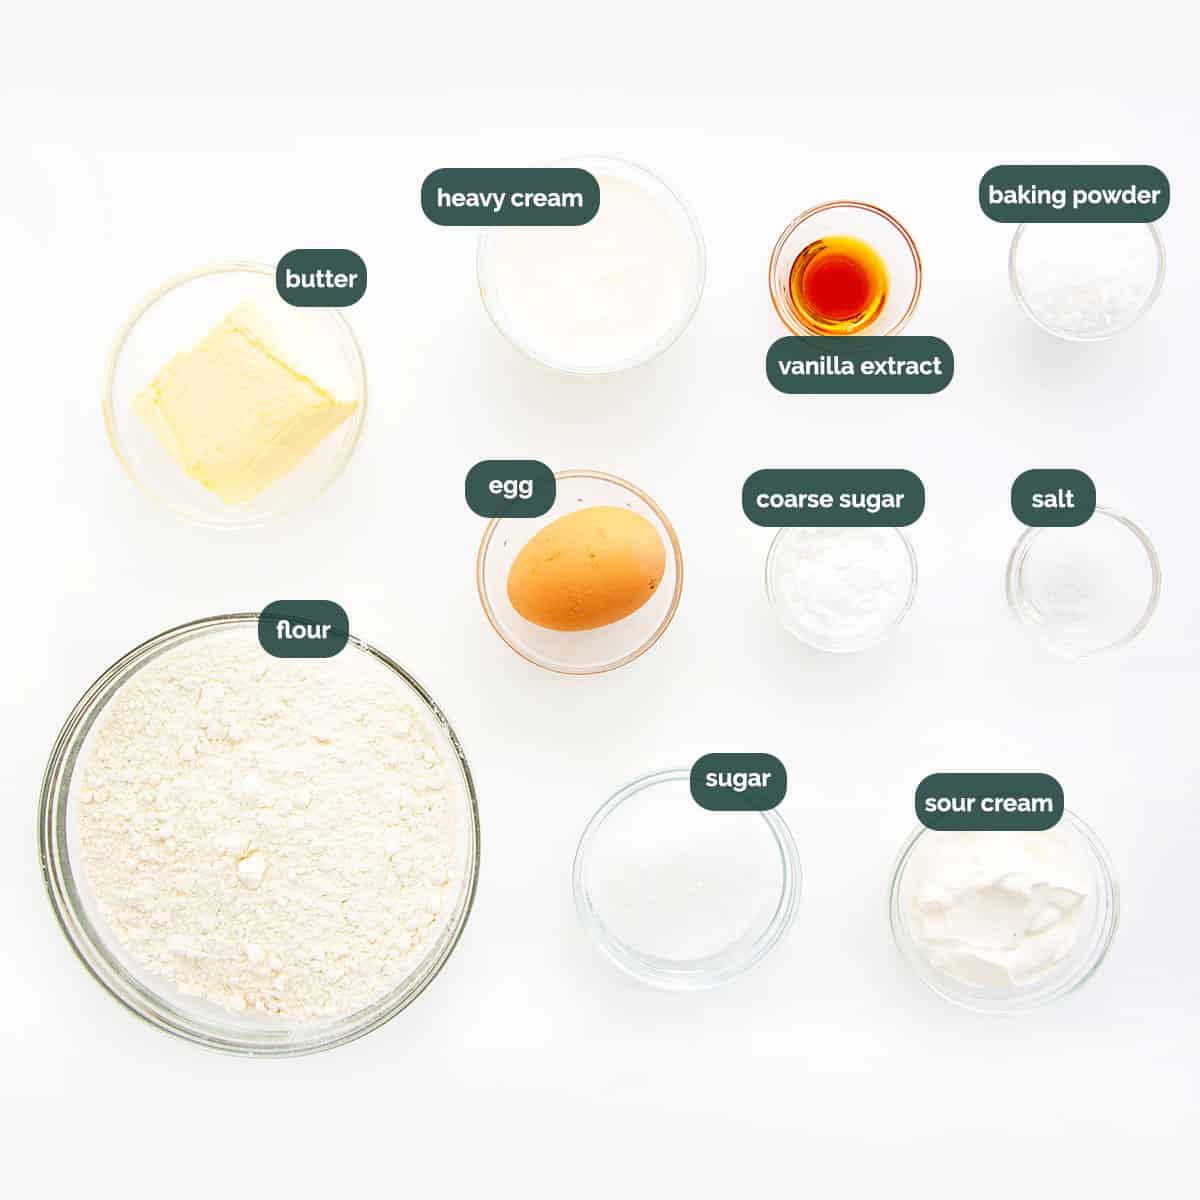
- Flour – All-purpose flour works best!
- Sugar – Plain granulated is all you need!
- Baking Powder – This is going to act as our leavener. Don’t substitute with baking soda, as it will give the scones an odd aftertaste.
- Salt – Imperative in baking, don’t skip it!
- Butter – I always use unsalted to control the sodium. You’re going to want to use FROZEN butter. The colder, the flakier your scones!
- Egg – I always use large eggs when baking. Lightly beaten.
- Cream – Heavy cream for this one! You can substitute half and half for a lighter fare.
- Sour Cream – This is going to make our scones extra moist and fluffy, plus it will give a nice hint of flavor.
- Vanilla Extract – Without vanilla, our scones may taste a little flat.
- Coarse Sugar – This is optional for topping, but I recommend adding it for an extra hint of sweetness!
How To Make Scones
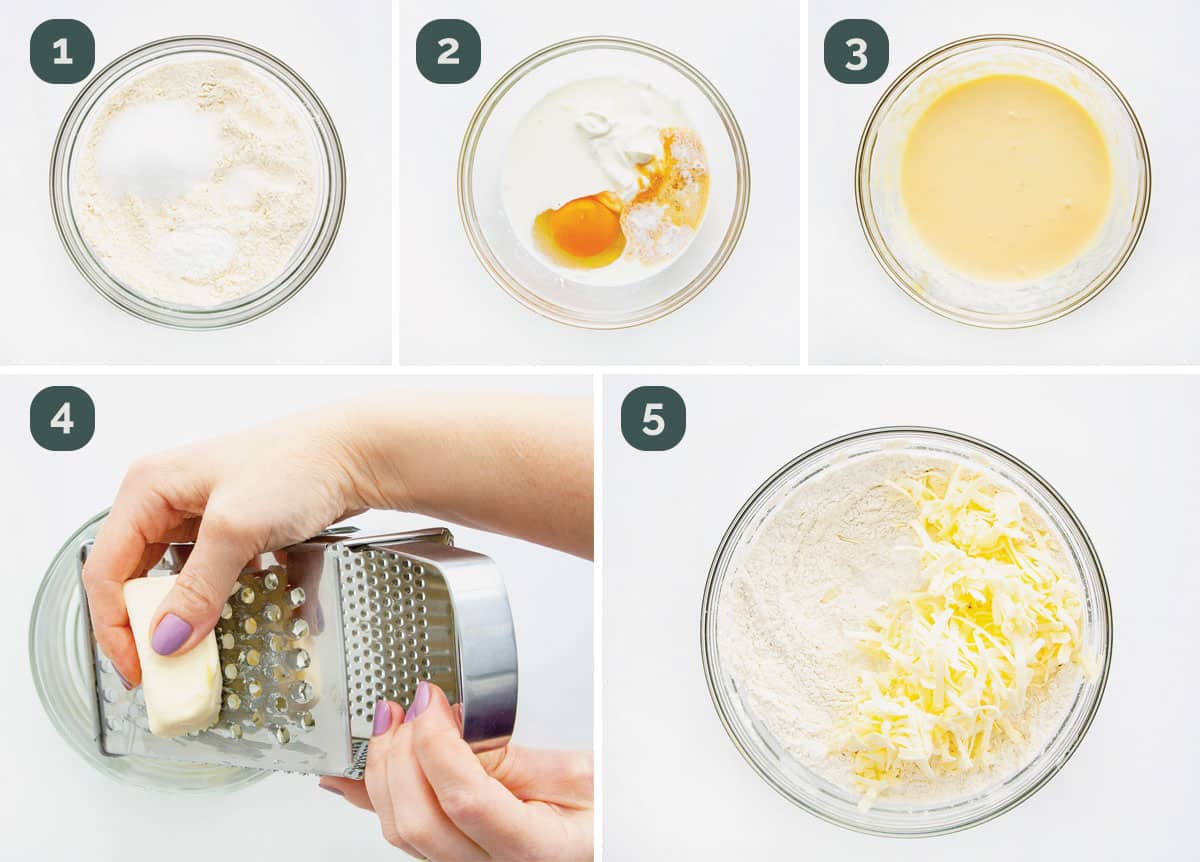
- Preheat Oven: Preheat your oven to 400°F. Line a baking sheet with parchment paper; set aside.
- Combine Dry Ingredients: In a large bowl combine the flour, sugar, baking powder and salt. Grate the butter using a box grater then add it to the flour mixture and mix it in.
- Mix Wet & Dry Ingredients: In a medium bowl, combine the egg, heavy cream, sour cream and vanilla. Make a well in the center of the flour mixture and add the wet ingredients. Using a fork, stir until moistened.
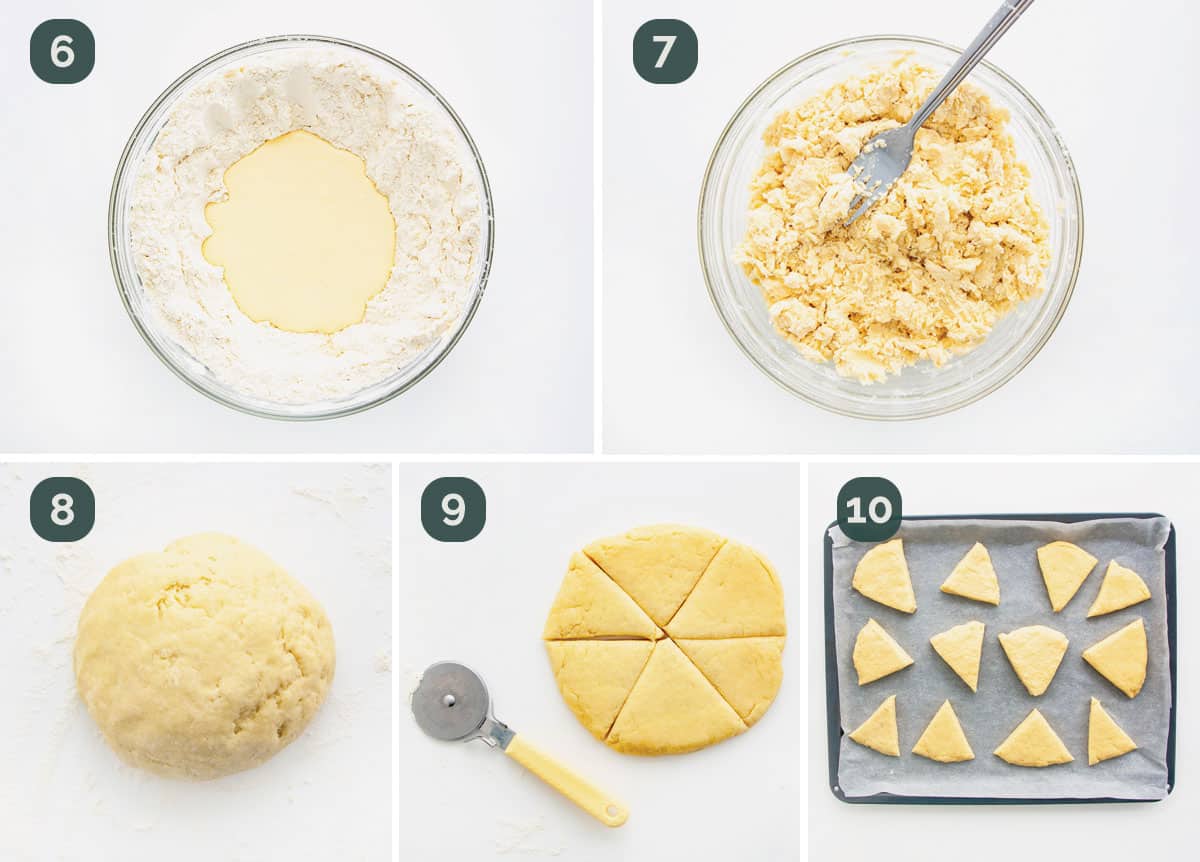
- Knead Dough: Turn the dough onto a lightly floured a clean work surface. Gently knead the dough about 10 to 12 times and form it into a bowl. If dough is too sticky, add a bit more flour.
- Divide & Cut Dough: Divide the dough in half. Roll out each half into a 6-inch circle. Using a pizza cutter or sharp knife, cut into 6 wedges, just like you’d cut a pizza. Place these wedges onto the prepared baking sheet, 2 inches apart. Repeat with remaining dough.
- Finish Rolls: Brush the rolls with additional heavy cream, then sprinkle with coarse sugar.
- Bake & Cool: Transfer the baking sheet to the oven and bake for 12 to 14 minutes or until bottoms are golden. Remove the scones from the baking sheet and finish cooling on a wire rack.
Frequently Asked Questions
What Is A Scone?
Scones are a British baked good, biscuit-like cake and it can be made savory or sweet. They also come in different shapes and sizes, they can be triangles like these scones, square or round. Totally up to you how you make them.
What Can I Add To My Scones?
This is a great base recipe leaving lots of room to add your favorite goodies! Any type of fruit (my favorite is strawberries or blueberries) chocolate chips, lemon, pumpkin, apple, banana, you name it! There are a wide variety of options for additions to these babies.
Can I Make These Scones In Advance?
Absolutely! These scones can be made ahead of time and frozen for future. They will last about 3 months in the freezer, leaving plenty of time to enjoy them at your leisure! Scroll down to “freezing” section below for full instructions.

Tips
- Always line your sheet pans with parchment paper or a silpat. This makes for easy clean up!
- Work with cold butter. It’s the secret to flakey scones.
- Don’t overwork the dough. You want the butter to still be in pieces to keep your scones flaky and light.
- Get yourself a pastry cutter. It’ll make the process of cutting the butter into the dry ingredients much easier.
- You want the dough to be sticky, so flour your hands and work surface as needed so that you can still handle it.

Storing Scones
Store your scones in an airtight container, bread box, or large freezer bag to keep them from drying out. They will last 1-2 days at room temperature or up to a week stored in the fridge. You can microwave your scones for 5-10 second intervals to enjoy them as they’re fresh out of the oven!
Freezing
You can also freeze your scones. Once completely cooled down to room temperature, wrap them each with both plastic wrap and foil. They will last 2-3 months frozen. They will thaw after about 1 hour at room temperature, or you can microwave them for 10 seconds at a time until thawed.

More Delicious Recipes To Try

Scones
Ingredients
- 2½ cups all-purpose flour
- ¼ cup sugar
- 1 tablespoon baking powder
- ¼ teaspoon salt
- ½ cup butter unsalted (8 tbsp), frozen
- 1 large egg lightly beaten
- ⅓ cup heavy cream
- ⅓ cup sour cream
- 1 teaspoon vanilla extract
- 2 tablespoon coarse sugar for topping
Instructions
- Preheat Oven: Preheat your oven to 400°F. Line a baking sheet with parchment paper; set aside.
- Combine Dry Ingredients: In a large bowl combine the flour, sugar, baking powder and salt. Grate the butter using a box grater then add it to the flour mixture and mix it in.
- Mix Wet & Dry Ingredients: In a medium bowl, combine the egg, heavy cream, sour cream and vanilla. Make a well in the center of the flour mixture and add the wet ingredients. Using a fork, stir until moistened.
- Knead Dough: Turn the dough onto a lightly floured and clean work surface. Gently knead the dough about 10 to 12 times and form it into a bowl. If dough is too sticky, add a bit more flour.
- Divide & Cut Dough: Divide the dough in half. Roll out each half into a 6-inch circle. Using a pizza cutter or sharp knife, cut into 6 wedges, just like you'd cut a pizza. Place these wedges onto the prepared baking sheet, 2 inches apart. Repeat with remaining dough.
- Finish Rolls: Brush the rolls with additional heavy cream, then sprinkle with coarse sugar.
- Bake & Cool: Transfer the baking sheet to the oven and bake for 12 to 14 minutes or until bottoms are golden. Remove the scones from the baking sheet and finish cooling on a wire rack.
Tips & Notes:
- Always line your sheet pans with parchment paper or a silpat. This makes for easy clean up!
- Work with cold butter. It’s the secret to flakey scones.
- Don’t overwork the dough. You want the butter to still be in pieces to keep your scones flaky and light.
- Get yourself a pastry cutter. It’ll make the process of cutting the butter into the dry ingredients much easier.
- You want the dough to be sticky, so flour your hands and work surface as needed so that you can still handle it.
- Store your scones in an airtight container, bread box, or large freezer bag to keep them from drying out. They will last 1-2 days at room temperature or up to a week stored in the fridge. You can microwave your scones for 5-10 second intervals to enjoy them as they’re fresh out of the oven!
- You can also freeze your scones. Once completely cooled down to room temperature, wrap them each with both plastic wrap and foil. They will last 2-3 months frozen. They will thaw after about 1 hour at room temperature, or you can microwave them for 10 seconds at a time until thawed.